

How To Make A Garden Window
Just because the temperatures are turning colder, there's no reason to say farewell to your garden—just move it indoors. Adding a bumpout Garden Window to your home allows y'all to grow herbs and plants throughout the year. Not a gardener? Don't worry, these cozy windows make the perfect napping area for the family true cat or a showpieces site for displaying collectibles.
One of the best places to locate a Garden Window is in a kitchen. Oftentimes builders install a hard-to-reach double hung window over a kitchen sink. Because they tin exist difficult to operate there, homeowners don't gain ventilation in the kitchen expanse. With operating casement sidelites that easily crank open up to allow in air the Garden Window solves that problem.
Simonton Windows offers a Garden Window that's piece of cake to install as a do-it-yourself project and adds value to the home.
Measure out Twice—Order Once
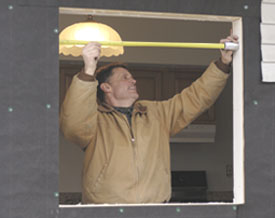
This simple installation project starts by gaining measurements of the rough opening and so that y'all tin gild the Garden Window. If y'all're replacing the existing window, accept off the window'southward casing trim. So mensurate the top, middle and bottom of the opening from side-to-side and summit-to-lesser. Also, measure the opening diagonally to ensure the surface area is square.
For a Garden Window, deduct 1/2″ in width and 1/2″h in top when ordering the unit. This volition ensure a properly sized unit to fit your expanse. Adjacent, measure the finished surfaces from the exterior to the interior wall using a combination square. You want to determine the maximum jamb depth to make certain the proper unit is ordered.

You'll want t o notation in your society if the window is for a new construction or a remodeling projection. If you are ordering for a new structure choice, flashing flanges come standard. If you're installing this unit as a replacement unit of measurement, the flashing flanges may be ordered as an option if you believe you'll demand them for the projection.
When placing the order with Simonton, brand sure to specify if y'all want a white, oak or birch stop on the interior of the unit. You may also social club an optional insulated sea board to place at the bottom of the unit of measurement which will help increase the R value of the window for cold climates. Instructions will make it with the sat board for like shooting fish in a barrel assembly and installation.
Inspecting the Window
After placing the window club and receiving the unit, carefully inspect the Garden Window. If y'all're installing this unit equally a replacement window, make certain to exercise this before removing the existing window. Double-cheque the dimensions of the unit to brand sure they match upwardly accurately with the dimensions ordered for the window.
Make certain you have received 12 screws with screw covers. You should also receive two brackets and a tempered drinking glass shelf for the window. If you ordered the flashing flange, make sure you received the trim piece that will snap in at the height of the outside of the unit to help prevent water infiltration.
If the checklist for your Garden Window comes upward good, and then move frontwards and remove the existing window right downward to the rough opening caused by rot earlier plumbing equipment the new window in place.

Dry out Plumbing fixtures the Unit
From the outside of the home, place a sturdy jack stand up straight below the exterior of the crude opening. Make sure the stand is level with the bottom sill of the rough opening and so that it can support the unit during installation.
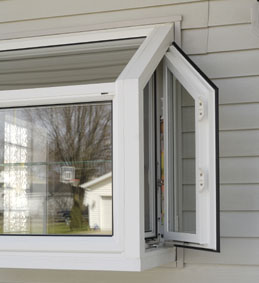
Have two people dry fit the window into the opening, using the jack stand to help steady the unit. While one person remains outside, have another person go within. Double-check to make sure the operable sidelites are fully operational and can hands open while the unit is dry fitted into the home.
Securing the Window
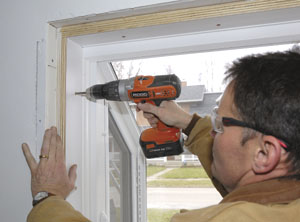
Still working with ane person exterior and one person inside (and using the jack stand for support), position the window and secure it with screws at the top of both sides of the interior of the Garden Window. Go approximately vi inches downwards from the top of the window for installation of the initial screws.
As the screws are being installed, make sure the unit is affluent to the interior. Pre-drilling the screw areas will make the installation go faster. With the initial screws in place, measure to ensure the Garden Window is plumb, level and square.
To check if the unit of measurement is plumb, identify a level vertically on both the interior and confront of the left and right jambs. If the chimera indicator is centered, the unit is plumb.

To check if the unit is level, place a level along the sill. If the chimera indicator is centered, the unit is level.
To check if the unit of measurement is square, measure the window frame diagonally. Measure from the acme left corner of the frame to the bottom right corner, and from the top right to bottom left. If the measurements are equal, the window is foursquare.
Once these measurements and verifications have been achieved, predrill all screw holes and shim all locations near the screws around the pinnacle and sides of the unit. Finally, install all screws. Three screws should exist installed on each of the 4 sides of the unit.
Interior Installation
Once your screws are installed, the outdoor person's job is washed. The unit volition support itself when the screws are firmly in identify. Again, before putting the screw covers on, check to make sure the unit is plumb, level and square. Next, trim off the shims flush to the wall.
To fill the gap around the unit of measurement, add fiberglass insulation, pushing information technology gently into place with a putty pocketknife. One time the unit is installed, if you lot determine that the gap opening is less than 1/eight-inch, y'all may choose to utilise sealant instead to fill the smaller air spaces. Add spiral covers to the interior of the unit and gently tap each one into place with a mallet.
Outside Finish Piece of work
Moving to the outside of the dwelling house, remove the jack stand. If you have chosen to employ the flashing flanges with this window, now is the time to apply a dewdrop of sealant in the accessory track at the top of the unit running the width of the window. Identify the accessory trim in the track and flush with the exterior wall. Tap into place with a mallet to create a firm fit that prevents water infiltration.
Add together sealant around the remaining sides of the Garden Window. Use a putty knife to make sure all the areas are sealed off with the adhesive. If you lot are non using a flashing flange, just use sealant around all four sides of the Garden Window.
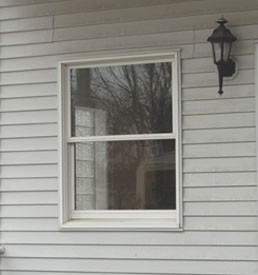
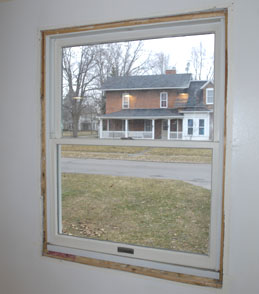
Before
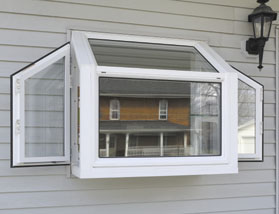
After
Final Trim Work
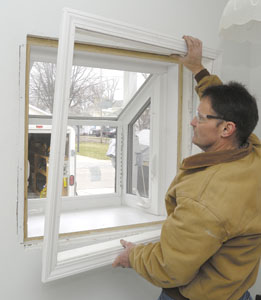
Back inside the home, add the casing trim effectually the interior of the window. Place the adjustable brackets into the openings and then add in the glass shelf. Note that the screens are removable from the within for cleaning or clear views. And, the casement handles fold-in for easy access.
If you're using the window for plants, make certain the seat board is protected from potential h2o spillage from constitute containers that could potentially stain or damage the seat board. And, note that the maximum weight chapters on the glass shelf is viii pounds per square foot.
As a final annotation, make sure to leave the bar lawmaking labels in place on the interior of the window unit. The information independent on these labels comes in handy if you always wish to replace a role.
Editor'southward Notation: For further information and installation instructions for Garden Windows, visit the Product Section at www.simonton.com.
Source: https://extremehowto.com/installing-a-garden-window/
Posted by: kimtudith.blogspot.com
0 Response to "How To Make A Garden Window"
Post a Comment