

How Long Do I Boil A Deer Head In Oxi Clean
By Jason D. Mills and Art Myers
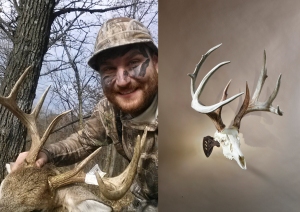
During hunting season, there are three great days for every successful hunter: the twenty-four hours you get your tag, the solar day yous fill your tag, and the mean solar day y'all hang your new trophy. However, shoulder mounts are expensive, costing anywhere from $400-500, and aren't necessarily suited for every deer. This DIY should take between ane-3 hours of labor throughout the course of one-ii days.
If yous tin't begin the cleaning and whitening process immediately, yous'll desire to store the caput in a freezer – this will stop any staining. Take the head out of the freezer about 24-hours earlier starting the cleaning and whitening process to give the meat plenty of time to thaw.
You lot'll need
- A sharp knife
- A high-pressure garden hose with adjustable nozzle
- Outdoor propane cooker (with a regulator)
- A large pot
- Needle-nose pliers
- Turkey baster with a bulb
- Big container to place to skull in
- Rubber gloves
- Eye protection
- Apron to wear while washing
- Bottle of 40 volume peroxide
- Oxiclean
- Borax (used in removing smaller, more stubborn pieces of meat that'southward stuck to the skull)
(You lot also have the selection of using our Skull Bleaching Kit
Pro-Tip: Never use bleach when whitening a skull as information technology could cause serious, irreversible harm to your trophy
Fill up a large pot of water; information technology should be big enough to completely submerge the deer'due south skull
Pro-Tip: Don't get to much water roofing the antlers because it may discolor them
Add one scoop of Oxiclean into the water, this volition human action every bit a degreaser
De-mankind the skull; you want to clean off the head every bit best every bit possible, removing all excess meat
Pro-Tip: Once the water has started to boil turn the burner down just plenty so that information technology does not overflow
In one case you've cleaned the skull as all-time equally you can, place it into your pot of boiling water. Ensure the water covers all the meat on the dorsum of the skull. The water should exist near 1/2″ in a higher place the base of the antlers.
Pro-Tip: Go on an eye on the skull through the whole boiling process to make sure it stays submerged. If not whatsoever meat on top will be very difficult to remove after
Leave the skull in the boiling h2o for almost thirty minutes
Pro-Tip: Do not go antlers to hot. Nearly antlers volition balance on the edge of the pot, which can scorch them
Pro-Tip: You'll know information technology'due south the perfect time to pull the head out of your humid water when the flesh on the skull cap simply begins to split
Remove skull and begin spraying it with a high-pressure level garden hose .If the tissue tin can be easily removed yous can get-go pulling information technology off with pliers. One time the skull starts to cool downward the tissue and fat will start Harding up. If this happens place it back in the water and await half an hour before removing more.
Pro-Tip: Anytime you volition be handling the skull after it has been in the pot clothing gloves. Bone can exist very hot and holds oestrus well
Exist sure non to get to shut to the nasal crenel, as high pressure level h2o can blow right through information technology.
Once all tissue is easily coming off you tin can remove the lower jaw os. The lower jaw is typically hands removed by spreading the oral fissure open as long as the tissue and mussel accept had enough of time to soak.
Pro-Tip: Although there is some argue on whether or not to remove the nasal cartilage, it'due south near impossible to completely make clean the skull with it in tact. That said, earlier get-go the washing process you will want to use a pair of needle-nose pliers or forceps to remove the nasal cartilage.
Subsequently yous've removed lxx-eighty% of the meat from the skull re-submerge it into your boiling water and leave information technology for another 20-thirty minutes
Pro-Tip: On deer at that place will exist two nasal covers that will need to come off while boiling then you tin clean all membrane from the nasal cavity. If any teeth or any other bones autumn off during the cleaning process exercise not go worried. All pieces volition need to exist cleaned and can exist glued dorsum on later. Besides a lot of times the lower jaw will divide in two half'due south which can be glued back together if it is to be used with the finished skull.
Pro-Tip: Do no blitz the removal of the lower jaw. If it does non want to dislocate soak it longer.
One the jaw has been removed at present information technology is time to remove the brain thing. I prefer to take a piece of copper wire about 10 to 12 inches long and make a J claw on the terminate I volition exist inserting into the skull. The J claw will help grab on to brain mater and pull it out.
Pro-Tip: The Borax will help in wearisome tissue removal. Sometimes the tissue is greasy and neither pliers nor your bare fingers tin take hold of it. Add a little Borax and y'all will be able to grab correct on to it.
Wash off the remaining meat (including whatsoever meat you might have missed in the nasal cavities and brain)
Repeat all processes until yous are sure that all tissue has been removed. If it has, you lot now tin dry all pieces off and wait almost a day to glue whatsoever teeth or basic back on. Make sure that you have removed all tissue from the skull. The last thing you volition want is to find out that you missed some after it has been hanging in the house.
Allow the skull to dry out completely
Pro-Tip: Although you don't take to, information technology'southward not a bad thought to wait a full 24-hours
Put on your gloves and center protection, you're about to beginning working with the xl volume peroxide – you practise non want to get this stuff on your skin. It will burn you. In fact, it'south a good idea to go along your frock on also as a long sleeve shirt, just in example.
Prepare the skull into your plastic container
Pro-Tip: Shrink wrap the base of the antlers to protect them during the bleaching process. Silicone record works well too; just avoid any tape with agglutinative
Pour about 1/ii a cup of the 40 volume peroxide into your plastic cup
Draw the peroxide into the baster
Pro-Tip: Do not get whatsoever of the peroxide onto the antlers, as it will turn them white as well
Using the baster, completely coat the skull in peroxide
Y'all can utilise as many equally four applications, but you will probably only need ii
Pro-Tip: Use the baster to draw up the peroxide that drips into your plastic container and reuse the peroxide – this will save you some money
Allow time for the skull to completely dry out
Pro-Tip: Putting your skull in the sun volition not only help it dry, it will as well assistance in the bleaching process
To hang your European skull mount
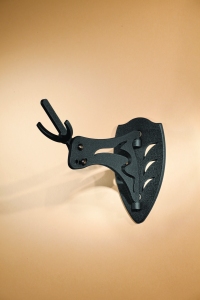
Take your Picayune Hooker out of its box
Pro-Tip: When it comes to European skull mounts, Skull Hooker'southward Large and Little Hookers are actually some of the best products out there. They're cheap, require no drilling into the skull, hang securely, accept total adjustability, and are exceedingly easy to install.
Locate a stud in the wall where you lot want to hang your new mountain
Hang the plate vertically on the stud
Assemble the arm with the prong attachment
Put the arm onto the wall plate
Slide the resting arm into the dorsum primary, natural opening in the skull (the spinal cord cavity)
Straighten or angle your new European wall mount to your liking

If you only whitened the trimmings, instead of using the Picayune Hooker, you lot'll want to employ the Os Bracket with Skull Hooker's Skull Cap.

Source: https://www.3riversarchery.com/blog/how-to-clean-whiten-and-mount-a-whitetail-deer-skull/
Posted by: kimtudith.blogspot.com
0 Response to "How Long Do I Boil A Deer Head In Oxi Clean"
Post a Comment